
If you are currently enrolled in Digital Photography this is where you will find details on class assignments. Remember that assignment deadlines are always posted to the Google Calendar Tab.
Assignments Sheets are posted here along with the description for each unit.
Assignments Sheets are posted here along with the description for each unit.
Camera Check Out Reminders
Cameras can be checked out at the end of each school day at 2:45. You may only check a camera out directly from me (Mrs. Bjork). Don't just take one off the shelf even if you're in that class room at the end of the day with another teacher. You have to get the camera from me, have me check it over to be sure all the parts are in the bag. You can then sign it out on the sheet. Cameras are due back during resource the next morning. If it is a Wednesday and I am in a meeting you need to stop by at the start of first hour to drop it off. I will give you a pass if needed to first hour. When returning the camera have it ready for me to inspect and then sign in the date you returned it. If you are absent it is your responsibility to get the camera returned to school by your parent. They can drop it office to the attendance secretary in the office. If you don't follow these rules you may jeopardize your ability to be allowed to check out a camera in the future.
Open Studio and Mac Lab Hours for End of Semester
Week of January 9--13, 2017: Tuesday, Wednesday, …………….………….. 2:45-4:00
Week of January 16-20, 2017: Monday, Tuesday Wednesday, Thursday…………2:45 – 4:00
All work must be done prior to the start of exams.
Week of January 16-20, 2017: Monday, Tuesday Wednesday, Thursday…………2:45 – 4:00
All work must be done prior to the start of exams.
Week of January 16 - 20Learning Targets: Research and Connect to a career in photography that you are interested in learning more about. Create a series of images shot in the style of the photography career field that you've researched. Develop a complex concept and composition that explores your chosen career style photography. Present a final series of 5 images within your final EXAM presentation (digital only, not printed) that illustrates the concept and career field.
Tuesday January 17th Last in Class Day to Complete Exam Presentations and 5 Career Photos Thursday: Exam B1 Friday: Exam B4 Week of January 9 - 13Learning Targets: Research and Connect to a career in photography that you are interested in learning more about. Create a series of images shot in the style of the photography career field that you've researched. Develop a complex concept and composition that explores your chosen career style photography. Present a final series of 5 images within your final EXAM presentation (digital only, not printed) that illustrates the concept and career field.
Monday: Wiki and Bridge Check Due TODAY!! Have rubric completed for our meetings. Work on editing your 5 Career Photos. Work on your exam. Wednesday/Friday: Work time to complete your 5 Career Photo edits and your EXAM presentation. Last day to turn in any late, missing or incomplete work is Friday January 13th. Tuesday January 17th Last in Class Day to Complete Exam Presentations and 5 Career Photos Week of January 2 - 6Learning Targets: Research and Connect to a career in photography that you are interested in learning more about. Create a series of images shot in the style of the photography career field that you've researched. Develop a complex concept and composition that explores your chosen career style photography. Present a final series of 5 images within your final EXAM presentation (digital only, not printed) that illustrates the concept and career field.
Tuesday: Photography in the Real World- Click here for details on your next unit. Thursday: Continue wiki research and photo shoot for Photography in the Real World. This unit is due for critique during the EXAM as a digital series only. No prints Introduce Final Exam Requirements Wiki Research and Bridge Check due Monday January 9th Week of December 19 - 22Learning Targets: Create a unique portrait of a place using knowledge of lighting and composition to evoke a specific mood. Utilize an alternative printing process to create a final unique art print for your portrait. Present and Respond to student art work through verbal and written critique process.
Monday: Last in class day to finish Portrait of A Place Images. Make sure you have the following completed for Wednesday's Critique.
Next Unit: Photography in the Real World- Click here for details on your next unit. Week of December 12 - 16Learning Targets: Create a unique portrait of a place using knowledge of lighting and composition to evoke a specific mood. Utilize an alternative printing process to create a final unique art print for your portrait.
Tuesday and Thursday: Continue with Portrait of a Place
Week of December 5 - 9Learning Targets: Create a unique portrait of a place using knowledge of lighting and composition to evoke a specific mood. Utilize an alternative printing process to create a final unique art print for your portrait.
Tuesday: Bridge and Wiki check for Portrait of a Place.
How to Work with Various processes with the equipment in the class room. Tour of supplies. Week of November 28 - December 2Learning Targets: Research and Connect to historical alternative printing techniques. Explore the varied ways one can complete a print that go beyond a piece of photo paper. Research the concept of places and photographers who have illustrated place through mood and lighting.
Monday-Friday: Introduction to Portrait of A Place Unit. Use the Portrait of A Place wiki to develop your ideas for this project. Start checking out cameras to do your photoshoot. Once you've read wiki, watched all the embedded videos and clicked all the links go to this wiki page to do your own research and develop your idea. Follow directions on the page and make sure you have thoroughly written a proposal that answers all of the questions. Photoshoot: Shoot 24-36 images for your Portrait of A Place. Wiki and Bridge Check will be Tuesday December 6th. Make sure you have completed a Bridge/Wiki Rubric for our meeting on the 6th. Week of November 14 - 22Learning Targets: Create unique portraits through natural and artificial light sources learning to set cameras up properly on tripods. Create a strong concept that reflects a mood through lighting and a unique point of view. Explore the difference between selfies and portraits.
Tuesday and Thursday: Edit and complete 3 best portraits. Mat for critique. One artist statement for the collection of 3 final portraits. Make sure you address the required questions and explain how you made your portrait a work of art that goes beyond selfie....CONCEPT! Learning Target: Present and Respond to student art work through verbal and written critique process. Monday November 21: Portrait Critique Make sure the following is ready for the critique.
Week of November 7 - 11Learning Targets: Research and Connect to historical photographic portraits and lighting techniques. Explore the difference between selfies and portraits. Create unique portraits through natural and artificial light sources learning to set cameras up properly on tripods. Create a strong concept that reflects a mood through lighting and a unique point of view. Explore the difference between selfies and portraits.
Monday 11/7: Finish wiki research started last week. Class photo-shoot in studio and around campus. Upload images to computer creating a folder in your Pictures folder called Portraits Make sure you are answering the following questions through your images: o What are you trying to say about the subject? oWhat mood does your image evoke? o Who is this person? o What is their personality? o Why did you photograph them the way you did? o How can you enhance the mood and interpretation of your work so people see what you want them to see? o Where will you photograph your subject? o Why is this important? Make sure you have shot all 6 lighting techniques and various compositional techniques. Lighting Techniques: Natural: candle/fire light, sun light (cloudy or sunny) and available light (light from a window inside) Artificial: dramatic studio lighting, bounce and fill, flash or any other electronic light source that is different from the studio lights. Bridge and Wiki check will be due Wednesday, November 9th.
Friday 11/11: Work on editing 3 best portraits for final printing and critique. Week of October 31 - November 4Learning Targets: Research and Connect to historical photographic portraits and lighting techniques. Explore the difference between selfies and portraits. Create unique portraits through natural and artificial light sources learning to set cameras up properly on tripods. Create a strong concept that reflects a mood through lighting and a unique point of view. Explore the difference between selfies and portraits.
Tuesday: Portrait Unit. What makes a good portrait, a true work of art, vs a selfie? Look at examples and discuss portraiture.
Thursday: View Portrait powerpoint discussing how to shoot a successful portrait with artificial and natural lighitng sources. Class photo-shoot in studio. Upload images to computer. Make sure you are answering the following questions through your images: o What are you trying to say about the subject? oWhat mood does your image evoke? o Who is this person? o What is their personality? o Why did you photograph them the way you did? o How can you enhance the mood and interpretation of your work so people see what you want them to see? o Where will you photograph your subject? o Why is this important? Lighting Techniques: Natural: candle/fire light, sun light (cloudy or sunny) and available light (light from a window inside) Artificial: dramatic studio lighting, bounce and fill, flash or any other electronic light source that is different from the studio lights. Monday 11/7: Finish wiki research started last week. Begin editing your portraits shot during class on Tuesday. Bridge and Wiki check will be due Wednesday, November 9th.
Week of October 24 - 28Learning Target: Create photographic works that explore alternative printing processes that utilize the sun as development source. Respond to art history and research to develop skills with Cyanotype and alternative photography. Create imagery that continues perfecting photo shooting techniques.
Monday and Wednesday: Continue with Cyanotype printing. Scan your finished prints and edit and save to your directory and Google Folder for our class. Start working on artist statement and mounting your print.
Friday: Cyanotype Critique. Have the following prepared for critique.
Week of October 17 - 21Learning Target: Create photographic works that explore alternative printing processes that utilize the sun as development source. Respond to art history and research to develop skills with Cyanotype and alternative photography. Create imagery that continues perfecting photo shooting techniques.
Tuesday: Continue with the Cyanotype process, making negatives and prints. If you never finished your wiki work on this during the in between times. Thursday: No School Week of October 10 - 14Learning Target: Create photographic works that explore alternative printing processes that utilize the sun as development source. Respond to art history and research to develop skills with Cyanotype and alternative photography. Create imagery that continues perfecting photo shooting techniques.
Monday 10/10: Introduction to New Unit on Cyanotype & Photograms You will be doing research on a new technique and unit called Alternative Photography. Please click the links here and read/click and watch all embedded content on each of the wiki pages. Remember that you are responsible for knowing all of the details about the cyanotype process. Watch all of the embedded videos and click all the links. Cyanotype Research Page Photogram Research Page What is Alternative Photography? How can the sun act as a photo exposure system? After you've read the wiki research pages develop your own response to Cyanotype by posting on the Cyanotype Research Page and linking your name to the page you create. You will post your research details here. If you finish your wiki research and page design begin working in Photoshop to begin editing the 2-3 images you have chosen as possible cyanotype prints. These images need to be prepared to become Digital Negatives and eventually cyanotype prints. See the WIKI page for the step by step Photoshop process. Click the button below for details on this unit. Wednesday: Demonstrate Making a Negative and Making a Cyanotype Print.
Week of October 3 - 7Learning Target:
Present and Respond to student art work through verbal and written critique process. Tuesday 10/4 Critique- You will digitally present your work from the class wiki. You will need to do the following:
Thursday 10/6 & Monday 10/10: Introduction to New Unit on Cyanotype & Photograms You will be doing research on a new technique and unit called Alternative Photography. Please click the links here and read/click and watch all embedded content on each of the wiki pages. Remember that you are responsible for knowing all of the details about the cyanotype process. Watch all of the embedded videos and click all the links. Cyanotype Research Page Photogram Research Page What is Alternative Photography? How can the sun act as a photo exposure system? After you've read the wiki research pages develop your own response to Cyanotype by posting on the Cyanotype Research Page and linking your name to the page you create. You will post your research details here. If you finish your wiki research and page design begin working in Photoshop to begin editing the 2-3 images you have chosen as possible cyanotype prints. These images need to be prepared to become Digital Negatives and eventually cyanotype prints. See the WIKI page for the step by step Photoshop process. Click the button below for details on this unit. Week of September 26 - 30Learning Targets: Create a unique, complex composition that illustrates a concept, combining 3 or more original photographs using Adobe Photoshop to create convincing light, shadows and selections. Present and Respond to student art work through verbal and written critique process.
Monday 9/26: Prairie Photo Shoot maybe......Work days to edit and complete your Texture Combine 3 project. Discussion of Texture Combine 3 Details of project and expectations for completion. See wiki for details. Work time to edit photos. Wednesday 9/28: Editing images and creating Wiki Page with images on it. Friday 9/30 Editing images and creating Wiki Page with images on it. Prepare for Critique...see below. Critique- You will digitally present your work from the class wiki. You will need to do the following:
Week of September 19 - 23Learning Targets:
PS 1, 2: Create images that illustrate Texture and utilize compositional techniques, proper lighting and focus. Tuesday 9/20: Outdoor photo shoot in the prairie. Dress for the weather. How to upload images to Bridge Thursday 9/22: Outdoor photo shoot in the graveyard. I will begin to show how to edit images using Photoshop. Week of September 12 - 16Learning Targets: Research compositional techniques, lighting and focus techniques while learning the technical side of using Digital SLR cameras.
Monday 9/12 : Research and analyze the technical vocabulary related to Digital Photography: Composition, Focus and Lighting Make sure you've put your Google Research Doc into the folder for your class. Once you've finished reading you will be working with a partner to design a wiki page that answers the questions about your research. Use the Wiki Page here to continue your assignment.
HOMEWORK: GET YOUR PERMISSION SLIP SIGNED SO YOU CAN USE THE CAMERAS! WAS DUE LAST CLASS!! Wednesday 9/14: Finish wiki research making sure your page is linked with yours and your partner's name. Introduction to the DSLR in small groups. Learning Targets:
PS 1, 2: Create images that illustrate Texture and utilize compositional techniques, proper lighting and focus. Friday 9/16: Presentation of your Wiki Research with partner Introduction to first Photo Assignment- Texture Combine 3. Keynote on Texture and Compositional Techniques review camera how to's, photo shoot in the classroom with still life objects and lights. Getting Started:Day 1-September 6Learning Targets: Create and Explore our digital work environment setting up digital accounts. Research compositional techniques, lighting and focus techniques while learning the technical side of using Digital SLR cameras. Today we'll be getting to know the mac computer and setting up the various digital accounts we'll be using in the class. Your goal is to set up the digital environment so you can be organized and easily find what is needed for the class. You need to be sure you have saved your passwords in a safe place that you can access during class. Technology Usage Contract letter needs to be signed and returned asap! The mac log in is username: last name 4 first name 3 grad year 2 digits password: your six digit student id Choose which browser you prefer to use, Safari or Firefox or Chrome. You will need to bookmark the following websites for use during class. 1. Class Wiki 2. PHS Digital Photo 1 Assignment Page (that's this one!) 3. Flickr After you've clicked the above links and bookmarked all, come back to the Class Wiki. You will be logging in using this enrollment code: https://wikispaces.com/join/HHKQQHM JOIN Code: HHKQQHM Once you've enrolled. Log into the wiki and do the following things.
Day 2: How Focus, Composition & Lighting, How DSLRs Work- Sept. 8Learning Targets: Research compositional techniques, lighting and focus techniques while learning the technical side of using Digital SLR cameras.
Go to the class Wiki and log in using the wiki login you were given last class. Presentation on Composition in Photography Research and analyze the technical vocabulary related to Digital Photography: Composition, Focus and Lighting, As you read take notes and save a Google Doc to the class Google Folder. In your notes answer all the analysis questions from the pages you are reading. B1 Class Folder B4 Class Folder Make sure you name your doc Lastname-First Name-Unit 1 research |
Printing in the Mac LabClick the button here to help with how to print in the Mac Lab. If you need additional help see your teacher.
White Balance: The Color of Light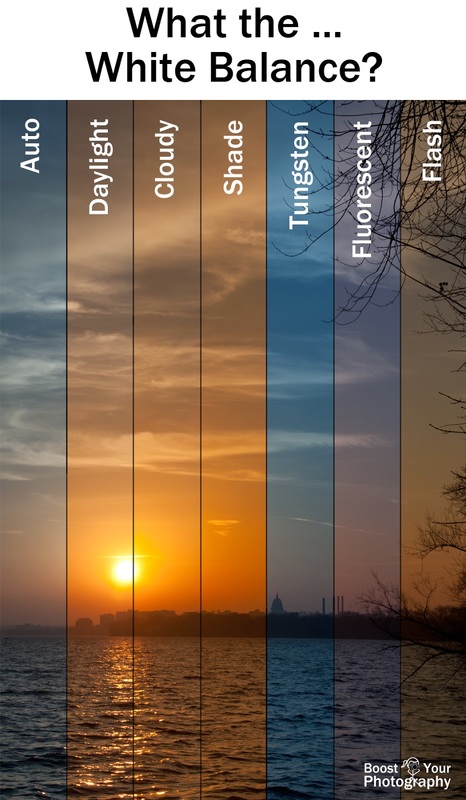
Assessment in This ClassAs always the artwork you create and the way you present it will influence the grades you receive in this class. We are in our second year as a district using Standards Based Grading. With each unit you will see a highly detailed form that describes the assignment and shows what Reportable Standards and Priority Standards are being covered in the unit. As we've done in the past you will participate in the critique process, which involves presenting your finished artwork and evaluating it in verbal and written form.
Inspiration
Photoshop Tutorials To Try so you can have wicked awesome skills!
Photoshop Tutorial on Water Effects Sistine Chapel 360 Virtual Tour Digital Photography Online Tutorials Adobe Layers Magazine Worth 1000 Amazing Photos and Photoshop Images How To Shoot Photos of Lightning Petapixel Photojojo Digital Atelier modern 21st century digital imaging and printmaking site, emphasis on alternative processes. Photography West Gallery: Features works by many of the Masters of Black and White Film Photography including Edward Weston, Imogen Cunningham, Ansel Adams, Paul Caponigro and more. Masters of Photography: Great website with lots of fabulous photographers who are historically significant. Imogen Cunningham one of my favorites! Fantastic imagery from the 20th century including portraits and flowers and more. Edward Weston master of light and shadow, emphasis on organic forms through still life, landscape and human figure. Ansel Adams master of light in natural settings. photographed the National Parks and helped with conservation efforts through his images. George Eastman House great museum and archive about the early days of photography. Kodak popularized photography for the everyday person. Many great tips and resources here. Historic Photo Archive Archive of First Semester 2013 Units |
